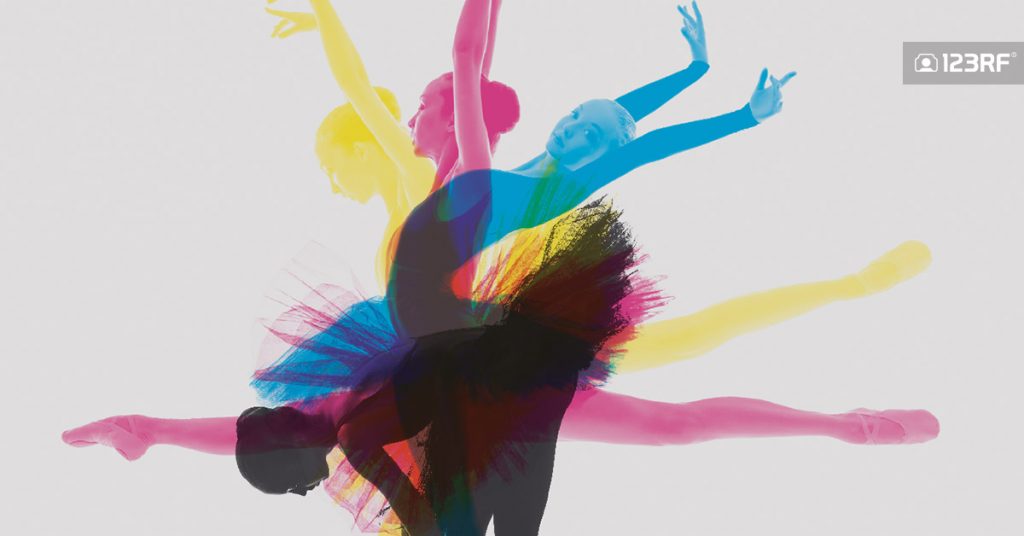
This multi-colored duotone effect is surprisingly easy to create, and can transform photos from so-so to impactful in an instant. Perfect for today’s fast-paced media where it’s necessary to make an impact, this tutorial will guide you on how to create the duotone effect in Photoshop, before finalizing a poster layout in InDesign. We’ll also take a look at how you can integrate your finished duotone effect into a social media image for using on Twitter or Facebook.
Suitable for beginners to both Photoshop and InDesign, we’ll break the process down step by step and make it quick and easy to recreate in your own designs.
Ready to get colorful? Awesome! Let’s get started…
What You’ll Need to Create Your Poster
This sort of effect works best when applied to a related series of four or five photos, preferably with a white or one-color background, which you can layer on top of each other to create a dynamic design. To create the poster design pictured here, you’ll need to download the following images:
To add typography to your poster design download and install the Bold weight of this Charlevoix Pro font too.
Apply a Duotone Effect To Your Images
Step 1
Open up the Dancer in Pose 1 image in Photoshop.
In the Layers panel drag the Background layer down onto the Create a New Layer button to duplicate it. Then switch off the visibility of the original Background layer, and we’ll work on the copy instead.
First we need to remove the background from around the image. To do this, go to Select > Color Range. Click once onto the white background to select it.
In the Color Range window, move the Fuzziness slider to the right until all the white in the image has been selected, creating a clean silhouette around the figure. Then click OK.

To perfect the selection further, click on the Refine Edge button in the top Controls panel. Adjust the Smart Radius and Shift Edge sliders until you’re happy with the selection.


Click OK, and then hit Delete on your keyboard to get rid of the background.
Step 2
From the bottom of the Layers panel choose Levels from the Create New Adjustment Layer drop-down menu.
Slide the mid-tone slider to the left to bring out more details in the image (if, like here, your image is dark and very silhouetted).

Step 3
Go to Image > Mode > Greyscale, and if a message prompts you to merge layers click Merge.

Then go to Image > Mode > Duotone. With the Preset set to Custom and Type to Monotone, click on the black color square next to Ink 1.
In the Color Picker window that opens type in 100 next to ‘C’ at the bottom-right corner, and type ‘0’ into the M, Y and K text boxes below this. Click OK.
You’ll notice that Ink 1 has now been renamed as Cyan. Click OK again to exit the window.

Step 4
Head up to File > Save As, saving the image as a Photoshop (PSD) file. Name it something memorable, like ‘Dancer cyan.psd’.

Step 5
Now we can repeat the process with the other images in the series. In this design we’ll have a focal image, set in black, as well as a couple more brightly colored images placed behind it. Let’s set up the black image first.
Open up the Dancer in Pose 2 image in Photoshop. Use the Select > Color Range function to isolate the white background as before and again use the Refine Edge function to perfect the selection.


Then delete the white background.
Step 6
Go to Image > Mode > Greyscale, as before, and then head up to Image > Mode > Duotone.
This time, when you click on the colored square, set the CMYK levels to C=91 M=79 Y=62 K=97, and click OK.

Name the color Rich Black and click OK.

The head up to File > Save As, and name the image ‘Dancer black.psd’ before saving as a Photoshop file.
Step 7
Open up the Dancer in Pose 3 image in Photoshop.
As before, repeat the process of removing the white background…

…and as we did with the first dancer image, add a Levels adjustment layer and bring out more of the mid-tones of the image.

Step 8
After going to Image > Mode > Greyscale, go to Image > Mode > Duotone.
Set the Ink 1 color to C=10 M=0 Y=90 K=0 and name it Yellow.


Then save the image as ‘Dancer yellow.psd’.
Step 9
Open up the final dancer image in Photoshop, Dancer in Pose 4.
After removing the white background, add a Levels adjustment layer, as before, and lighten up the image a little.

Go to Image > Mode > Greyscale, then Image > Mode > Duotone.
Set the Ink 1 color to C=0 M=100 Y=0 K=0 (Magenta).

Then save the image as ‘Dancer magenta.psd’.
How to Incorporate Your Duotone Effect into a Poster Layout with InDesign
Once you’ve applied a duotone effect to your images, you’re ready to incorporate them into a design. Here, we’ll look at how to put together a poster layout advertising a ballet company. Skip ahead to section 3, below, to find out how to adapt your design to a social media image.

Step 1
Open up InDesign and go to File > New > Document.
With the Intent set to Print, set the Width of the page to 711 mm and Height to 559 mm—this is equivalent to a ‘Half-Sheet’ standard poster size. You can of course create the poster to a different size if you prefer.
Set the Margins to 30 mm on all sides and add a Bleed of 5 mm to all edges of the page. Then click OK to create the new document.

Step 2
Expand the Layers panel (Window > Layers) and click on the Layer 1 name to open the Layer Options window. Rename the layer Background and click OK.
Create a further two new layers (by selecting New Layer from the panel’s top-right drop-down menu), naming them Dancers and, at the top of the sequence, Typography.

Then lock the Typography and Dancers layers, and click on the Background to activate it.

Step 3
Expand the Swatches panel (Window > Color > Swatches) and choose New Color Swatch from the panel’s top-right menu. Set the Type to Process, Mode to CMYK, and name it Pale Grey. Set the levels to C=8 M=6 Y=7 K=9. Click Add, and then OK.
Take the Rectangle Tool (M) and drag across the whole page, extending it up to the edge of the bleed on all sides. From the Swatches panel set the Fill of the shape to Pale Grey.

Step 4
Return to the Layers panel and lock the Background layer. Unlock the layer above, Dancers.
Select the Rectangle Frame Tool (F) and drag to create an image frame on the page. Go to File > Place and choose the ‘Dancer black.psd’ image, and click Open. Set the image centrally on the page, as shown below.

Step 5
With the image frame selected go to Object > Effects > Transparency.
Choose Multiply from the Mode drop-down menu and bring the Opacity down to 65%.

Then click OK to exit the window.
Step 6
Create a new image frame and File > Place, choosing the image ‘Dancer cyan.psd’. Open the image and position the frame directly over the top of the first.

Go to Object > Effects > Transparency and set the Mode to Multiply and Opacity to 85%. Click OK.

Step 7
Repeat the same process as described in Step 6, above, for the image ‘Dancer yellow.psd’.


..and the final image, ‘Dancer magenta.psd’, applying the 85% Multiply transparency effect to each.


Step 8
You can add typography to your poster design by first locking the Dancers layer, and unlocking the top Typography layer.
Here I’ve created a few text frames in the top-left corner of the poster using the Type Tool (T), and typed in ‘BALLET’ split into three separate frames.
You can format the text using the Character panel (Window > Type & Tables > Character). Here, I’ve set the Font to Charlevoix Pro Bold and adjusted the Font Color to [Paper] from the Swatches panel.


Your poster design is finished, great job! You can now head up to File > Export to export your design as a PDF or JPEG image, ready for printing or circulating online.
How to Adapt Your Duotone Image for Social Media
If you’re using your duotone effect for a marketing campaign, or would simply prefer to share your hard work online, you can adapt the image for social media. Here we’ll put together a document in InDesign that can be used for Twitter and Facebook promotional images.
Step 1
In InDesign go to File > New > Document.
Set the Intent to Web and Number of Pages to 1.
Set the Width to 440 px and Height to 220 px. This creates a page size suitable for an in-stream twitter photo. Click OK.

Now you’re ready to start creating your Twitter image. If you want to create an image for Facebook promotion instead, skip ahead to Step 6, below.
Step 2
Expand the Swatches panel (Window > Color > Swatches) and click on New Color Swatch from the panel’s drop-down menu. Make sure the Mode is set to web-friendly RGB, before setting the levels to R=223 G=222 B=222. Name the swatch Pale Grey and click Add and OK.

In the Layers panel (Window > Layers) rename Layer 1 as Background. Use the Rectangle Tool (M) to create a rectangle that covers the whole page. Set the Fill to Pale Grey.

Step 3
Create a new layer named Dancers, locking the Background layer below.
File > Place your first dancer image onto the page. To make the social media image have more impact, it’s best to scale the design up to make the upper bodies and faces of the dancers large and central on the image. So build up your images while working towards that goal.

Go to Object > Effects > Transparency to add a 65% Multiply effect to your dancer image.

Step 4
Then Edit > Copy, Edit > Paste the image, before going to File > Place to replace the image with the next dancer.

Repeat the action, to build up the sequence of dancers on the page.

Step 5
A social media post will benefit from big look-at-me typography. Create a new layer, and use the Type Tool (T) to create a text frame across the center of the layout.
Type in an attention-grabbing slogan or event title, and set the Font to Charlevoix Pro and Font Color to [Paper].

With the text frame selected, go to Object > Effects > Transparency and set the Mode to Overlay and Opacity to 90%.

To export your Twitter image ready for uploading online, simply head up to File > Export and choose PNG or JPEG from the Format menu at the bottom of the Export window.

Step 6
You can create an image suitable for use on Facebook in the same InDesign document, and quickly and easily adapt your existing twitter image design for this purpose.
In the Pages panel (Window > Pages), drag the Page 1 icon down onto the New Page button at the bottom of the panel, to duplicate the page.

Scroll down to Page 2 of your document. Select the Page Tool (Shift+P) and click onto the page to select it.
From the Controls panel at the top of the workspace, make sure the Liquid Layout option is set to Scale. This will ensure the graphic elements on the page will scale alongside the page.

You can either manually drag the edges of the page to the desired dimensions (holding the Alt or Option key on your keyboard), or manually enter the dimensions into the boxes in the Controls panel. For a Facebook image which you can share inline on a page, set the Width to 1200 px and Height to 630 px.

And there we have it! Your Facebook image is finished. To export it go to File > Export, choose JPEG or PNG, and set the page to export just Page 2 of your document.

Conclusion: Your Finished Duotone Effect
In this tutorial you’ve learned to create a colorful duotone effect, which would make a beautiful addition to any design layout. Whether you choose to adapt it to a poster format for printing or integrate it into a social media image, you’ll be sure to turn heads!
If you’re on the hunt for more photos to apply this effect to, white-background portraits make a fantastic basis for making cool duotone designs. Check out these white-background portraits over on the 123RF library.
This article was first published on https://blog.123rf.com/create-a-colorful-duotone-effect-for-print-web/